Lambda functions scale almost infinitely, but your budget most likely won't. This guide teaches you some tools for monitoring and controlling the costs of your serverless solutions.
When done correctly, Lambda functions can be amazing. They can save you lots of money and headaches. However, a common concern for new Lambda users is how to keep the budget under control. Lambda functions are billed by milliseconds of use, which is mostly a great thing as it allows you to save huge chunks of money when compared to server-based solutions. On the other hand, if you're not careful auto-scaling can lead to nasty surprises in your monthly AWS bill.
There are two primary ways in which Lambda functions can cause you an unexpectedly large bill:
- A programming error that creates a vast number of invocations (this has happened to me.)
- A malicious actor who repeatedly invokes a publicly exposed function (a.k.a. DDOS attack)
Item number two caused me great concern as I was starting out with Lambda. What if somebody just floods my publicly available Lambda with requests and causes me a massive bill? The difference between a server and a Lambda is that when a server gets DDOS attacked it starts to drop requests whereas a Lambda will scale and continue to incur higher and higher expenses to its unfortunate owner.
In hindsight, I should have been more worried about item number one (programming errors), as that's what actually ended up hurting me. In any case, it's good to be prepared for both scenarios.
In this guide, we'll take a look at multiple ways of ensuring that your Lambda costs are kept in check. Here's a list of the things we'll cover:
Each section contains links to the relevant pages in AWS documentation
Billing Alarms
Billing Alarms are the essential tool for monitoring your AWS costs. If you haven't set a billing alarm for your account you should do it immediately. This is an easy way to get notified if your monthly AWS bill is estimated to cross a set threshold.
The official documentation already includes a great guide for creating billing alarms so I won't repeat it here.
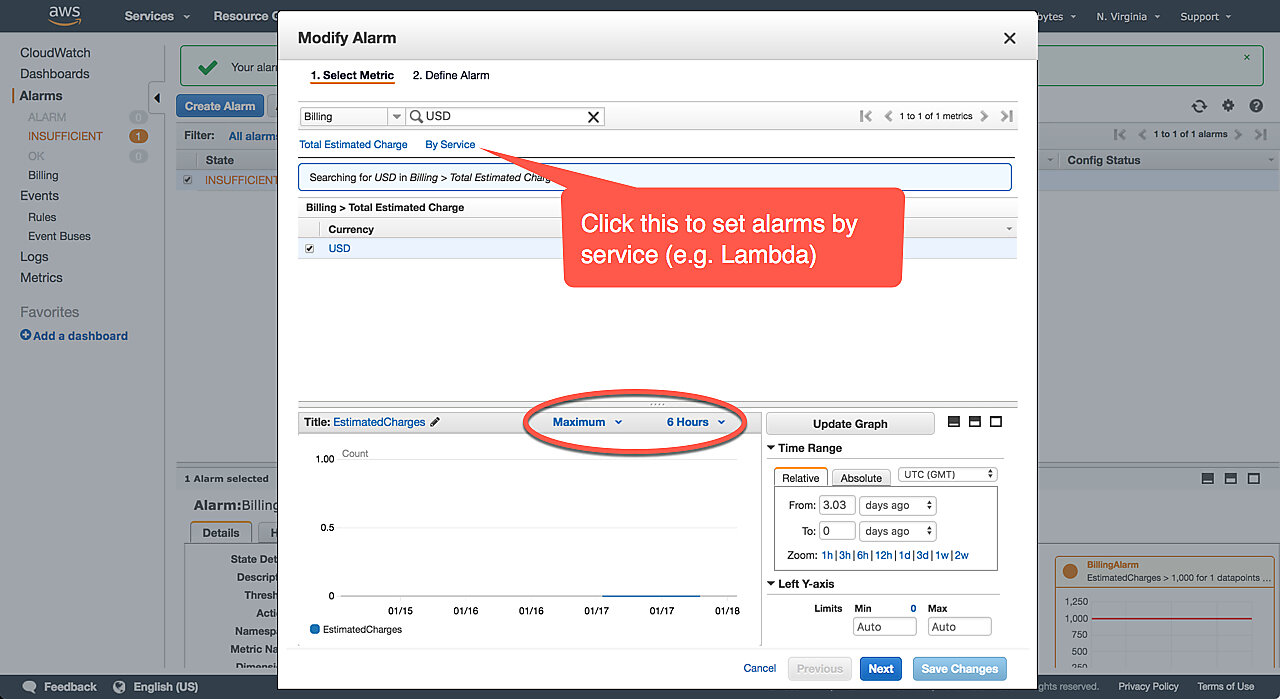
The only potentially confusing part is selecting the time period and statistic for your billing alarm. You should choose Maximum and 6 Hours. These are the defaults for billing alarms and, at the time of writing, if you choose anything else AWS will display a warning prompting you to set the values back to defaults.
In plain English, the meaning of the billing alarm is the following: if in the past 6 hours the maximum estimate for charges is more than my threshold, then notify me. Estimated charges refer to your next monthly AWS bill. In other words, AWS tries to estimate the next bill and warn you if you're projected to overrun your predefined threshold.
Note that you can also set billing alarms for individual services such as AWS Lambda. To do this, click By Service in the Select Metric panel and then choose the service you want to set the alarm for.
Budgets
Budgets are like billing alarms in that they provide a way to monitor your costs. Compared to Billing Alarms, though, they allow for better targeting of resources.
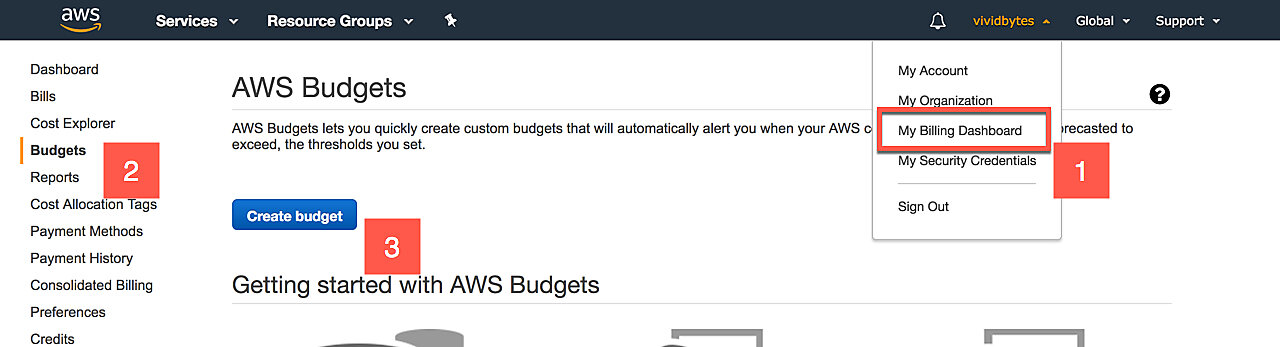
To create a budget, first click My Billing Dashboard in the top-right
menu. Then click Budgets in the left-hand sidebar, and finally click
Create budget.
Let's go through some of the options for creating a new budget:
Budget details
You can set the budget to either track cost or usage. Choose cost and enter your budgeted amount below.

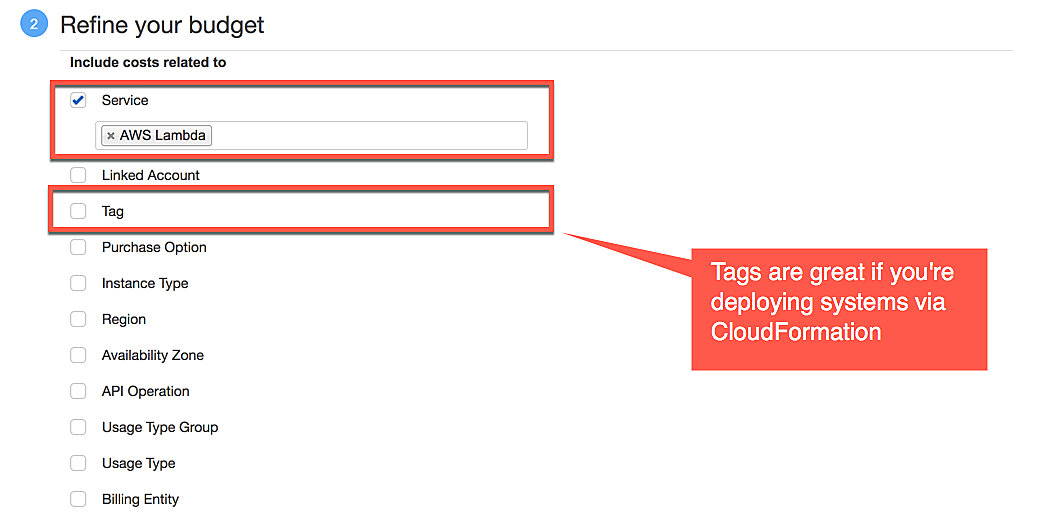
Refine your budget
Budgets allow for tracking of individual services such as Lambda, or a group of resources via tags. Tags are especially useful when you've deployed a group of resources via CloudFormation. CloudFormation automatically assigns tags to each resource in a given stack with the stack name and id (see AWS CloudFormation Resource Tags).
Budget Notifications
Obviously, just setting a budget isn't going to do much. You need a way to monitor the budget and to react to budget overruns. The first thing you should do is make sure you get an email when the budget is projected to go beyond the limit you've set by adding your email to the Email Contacts
You can also attach SNS topics to your notifications. This allows for execution of arbitrary code via Lambda functions whenever a budget notification is triggered. You must bind the topic policy below to your SNS topic. Remember to insert your own topic-arn as the "Resource". Without this policy, AWS Budget won't be able to publish to the topic.
|
|
Rate Limits
As I alluded in the introduction, there's a trade-off between how much you want to be able to scale and the maximum amount you're willing to pay. After setting billing alarms and budgets, the next step is to make unexpectedly large bills impossible. Since lambdas are charged by usage, the logical way of limiting costs is to limit the total number of invocations your Lambda functions can have. There's a few ways of doing this. Let's first go through a summary of our options and then dig deeper into each item:
Set Concurrency Limits for Individual Lambda Functions
Lambda functions have a property called Reserved concurrency, which lets you limit the number of concurrent invocations a given function can have. You could, for example, set this to 1 during development to prevent programming errors from causing any extra charges (yes, I've seen this happen).
Set Rate Limits to API Gateway
API Gateway is often used for exposing your Lambda functions to the Internet via HTTP. It's possible to set rate limits to your API endpoints, thus putting a cap on the maximum number of Lambda invocations.
Use AWS WAF to mitigate HTTP flooding
One of my fears when I first started using Lambda was "What if someone does a DDOS attack on my Lambda functions and causes me a huge bill?". AWS WAF helps to mitigate this problem by allowing you to set rate limits and block IP addresses that violate those limits.
Concurrency Limits for Individual Lambda Functions
By default, up to 1000 Lambda instances can run concurrently on your account. I can think of a few situations where such high concurrency is not desirable:
You have only a few Lambda functions and you'd like to make sure none of them can incur a large bill in the short term. You can set a reserved concurrency limit on all of these functions and effectively cap the total concurrent execution limit to something far below the default 1000 executions.
You have tons of Lambda functions, possibly more than 1000. Out of these functions, there are a few that you'd like to be highly available (no throttling). You can then reserve a chunk of your concurrency executions for those top priority functions and leave the rest of the concurrency pool unreserved.
You have one or more Lambda functions that connect to a database (or other services) that you don't want to overload with requests. By setting concurrency limit on those functions you set a cap on the maximum number of database connections your Lambda functions can create.
In this guide, use case 1 is what we are interested in. From a budgeting perspective, a rate limit sets a hard cap on the dollar amount that a given Lambda can cost you per hour, day, month, etc.
Fortunately, there is a straightforward solution: lambda concurrency limits. You can set a hard cap on Lambda scaling by deciding how many instances of each Lambda are allowed to run at the same time. Once the concurrency limit has been reached, the extra invocations will be throttled. Make sure you understand Lambda throttling behavior first. Invoking a Lambda function once the concurrency cap has been reached doesn't necessarily mean that the function will never run, just that its execution has been delayed.
The way AWS let's you set concurrency limits is unintuitive, to say the least. What follows is my best attempt at explaining it:
By setting a concurrency limit you reserve concurrency for the Lambda in question. That's why in the UI they are referred to as reserved concurrency. By default, your AWS account has a total concurrency limit of 1000. A minimum of 100 concurrent executions are always pooled away for functions that have no reserved concurrency. So you have 900 concurrent executions you can reserve for individual functions.
That is, you can have a total of 1000 instances of Lambda functions running concurrently. By setting a reserved concurrency limit on any individual Lambda function, the functions that have no reserved concurrency executions will share the remaining quota (minimum of 100 executions).
For example, if you have a total of five functions, and you set a concurrency limit of 5 on one of them, that particular function can only run five instances concurrently while the remaining four functions have a combined quota of 995 concurrent invocations.
The combined quota is important if you have a large number of functions. Particularly, if you have more than 900 functions, you can't set a reserved concurrency limit on all of them unless you request AWS to increase the total concurrency limit for your account. However, there are other ways of limiting concurrency as we'll see in the following sections.
One more thing. Reserved concurrency cannot be applied to individual versions of the Lambda function. When you set a concurrency limit, it will be a shared limit for all versions of that Lambda function.
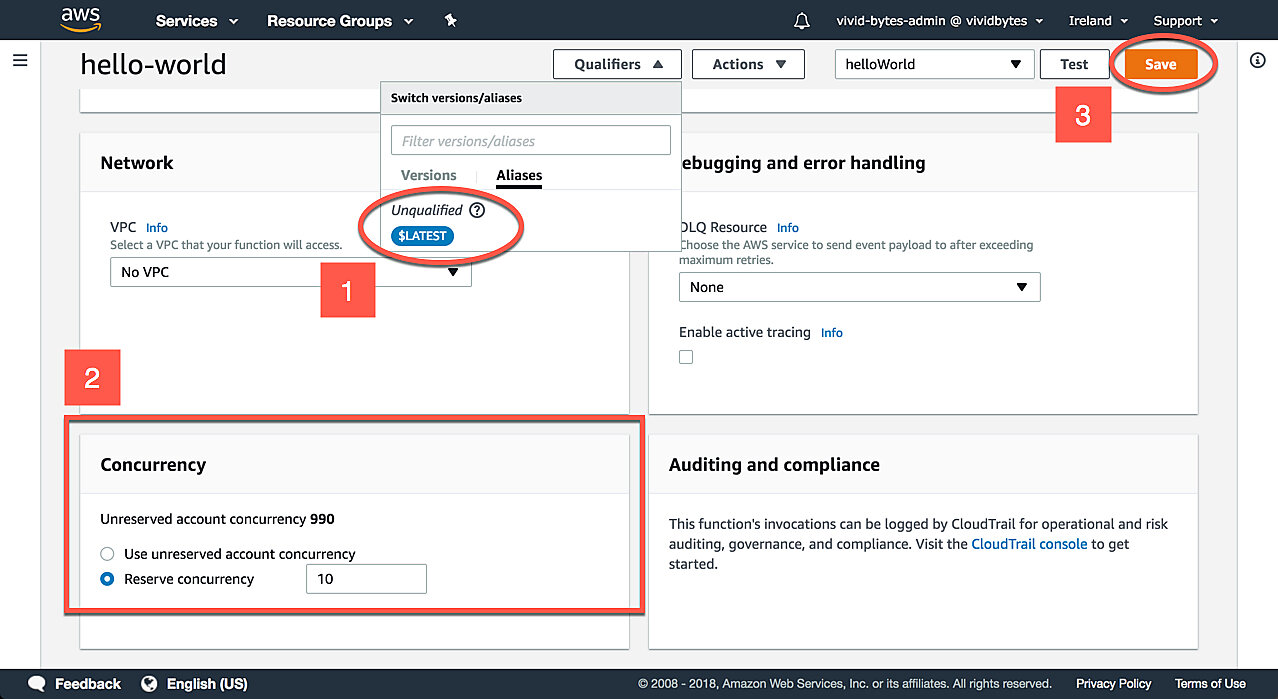
Setting Concurrency Limits in the Web Console
In the AWS web console, navigate to the function that you want to edit. Make sure to select an unqualified version of the function. Otherwise, the reserved concurrency limit will not be available to you.
Then, scroll down, and you should see a panel titled Concurrency. Click the Reserve concurrency radio button and type in a concurrency limit.
Remember to click Save in the top-right corner.
Setting Concurrency Limits via AWS CLI
Using the AWS
CLI,
you can reserve concurrency via the put-function-concurrency command.
|
|
To remove reserved concurrency use the delete-function-concurrency command.
This has the same effect as clicking the Use unreserved account concurrency
radio button in the web console.
|
|
Setting Concurrency Limits via CloudFormation
CloudFormation provides the ReservedConcurrentExecutions property. Leaving it
out will cause the function to use unreserved account concurrency. Check out the
official
documentation
for more information.
|
|
At the time of writing, reserved concurrency support hasn't landed to SAM, but there is an open ticket for that (it may be closed when you're reading this.)
Limit Concurrent Invocations for API Gateway endpoints
Concurrency limits on individual Lambdas are great, especially when you're experimenting and want to avoid unexpected bursts of invocations. However, there are many cases where they are not a good fit. In this section we'll learn another rate limiting technique using API Gateway.
API Gateway is the most common way of exposing Lambda functions to the public Internet. In this section, we learn how to set rate limits to your API Gateway endpoints. You can set rate limits at stage or at method level.
API Gateway gives us two variables: Rate and Burst.
Rate defines the maximum requests per second for the API. If the limit is exceeded API Gateway starts returning HTTP status code 429 Too Many Requests.
Burst refers to the maximum concurrent requests. Similarly to rate, going over the burst limit causes API Gateway to respond with 429 Too Many Requests.
At the time of writing, API Gateway has an account level Rate limit of 10,000 per second and a Burst limit of 5,000 requests across all APIs (Refer to the official documentation for up to date limits.) Depending on how long your Lambda functions take to execute, it's possible you hit this limit far earlier than Lambda concurrency limits. 1000 per second is pretty high and I expect there to be very few applications that actually need such high availability.
Next, lets look at how we can lower that limit to better match our use case:
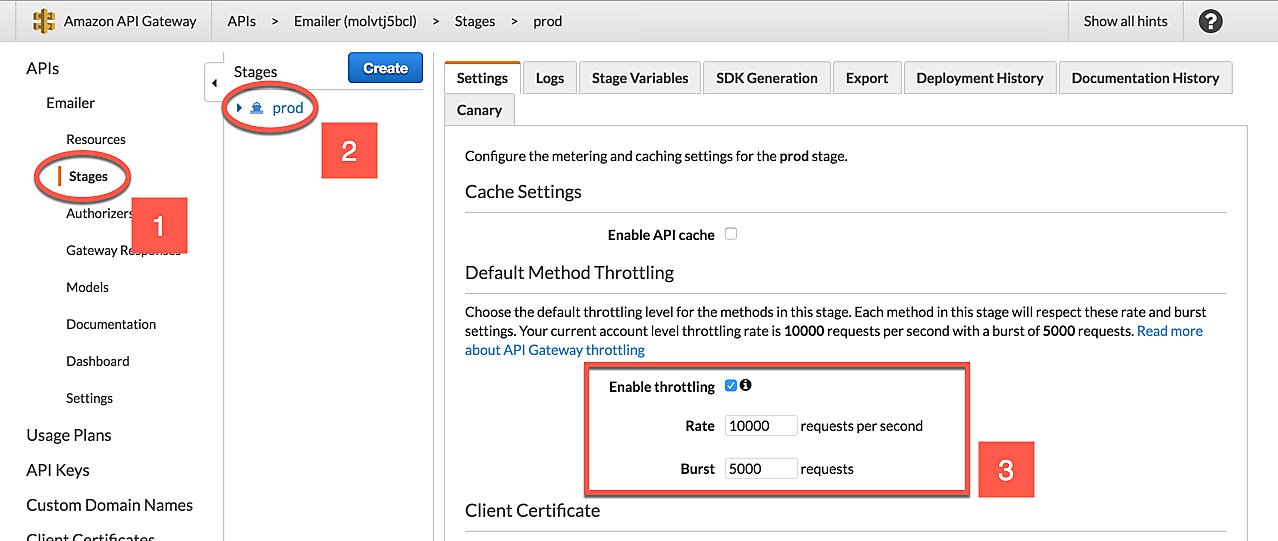
Setting Stage Level Throttling in the Web Console
- Select stages in the left-hand sidebar.
- Select the stage you want to apply throttling to.
- Change the Rate and Burst values to your liking.
- Click Save Changes.
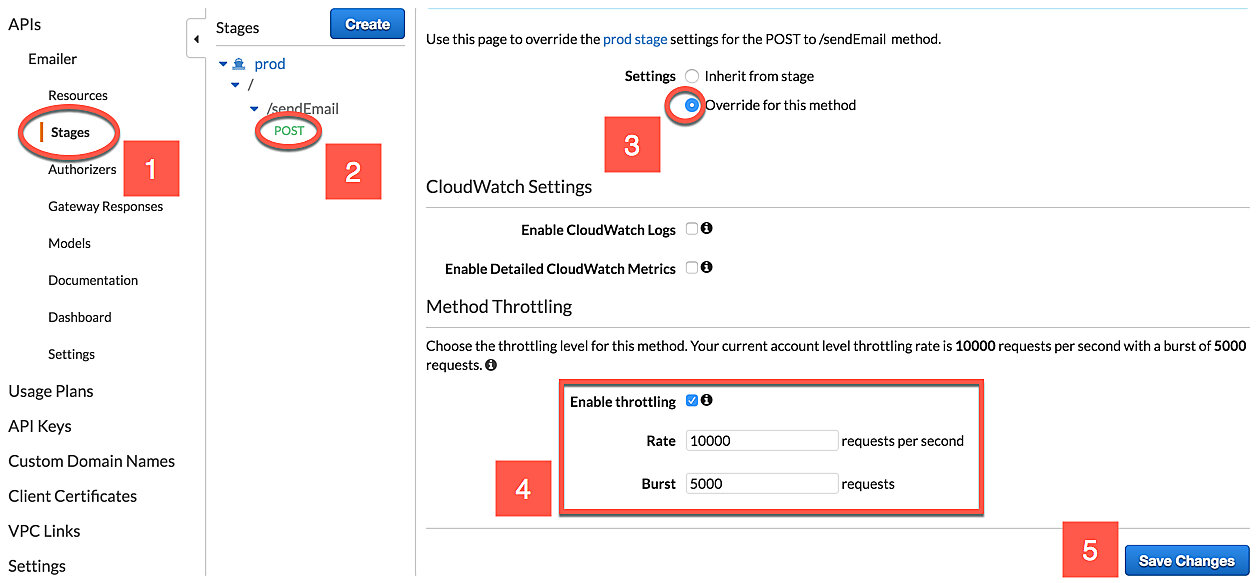
Setting Method Level Throttling in the Web Console
- Select stages in the left-hand sidebar.
- Select the method you want to apply throttling to.
- Under Settings, click the Override for this method radio button.
- Change the Rate and Burst values to your liking.
- Click Save Changes.
Setting API Gateway Throttling via CLI
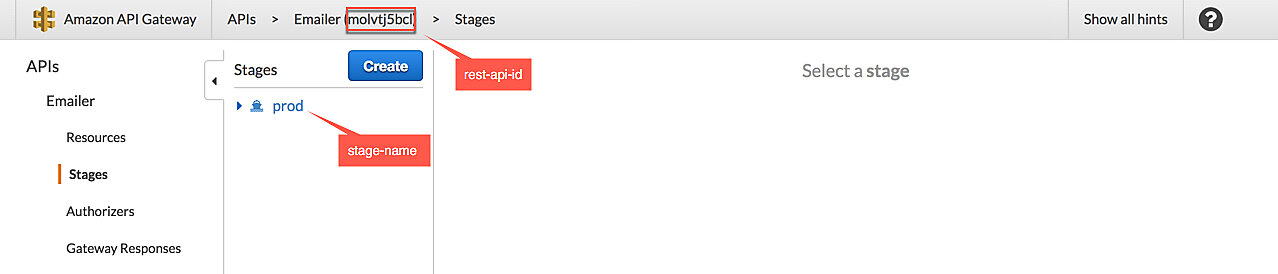
You can update API Gateway throttling via the CLI as well, but first you need to
obtain the rest-api-id and stage-name. You can find them in the web console
(see the image below), or by calling the get-rest-apis command in the CLI.
The right command to call here is update-stage. The syntax for thepatch-operations option takes some effort to figure out but I've got you
covered. Just change the value for rateLimit and burstLimit to your
liking. The command below updates stage-level throttling.
|
|
To update method-level throttling use the same command, but change the
path parameter on the last two lines. The syntax is:
|
|
If your endpoint has a subpath, you must escape slashes with ~1. For example, a
hypothetical blog resource GET /posts/42/comments would become
/posts~142~1comments/GET.
|
|
Setting API Gateway Throttling via CloudFormation
In CloudFormation, both stage-level and method-level throttling is configured in
Stage resource, specifically in the MethodSettings attribute. To configure
stage-level throttling, the ResourcePath must be set to /* and the HttpMethod
to *.
For method-level throttling, insert the endpoint path and the
method name. Similarly to the CLI, you have to replace all except the first
slash in theResourcePath with a ~1.
Check the official documentation for more options.
|
|
AWS WAF (Web Application Firewall)
WAF stands for Web Application Firewall. You might ask what a firewall has to do with cost controls. The answer is DDOS attacks in the form of HTTP flooding. In a conventional server model, sending an excessive number of HTTP requests to one of your endpoints may bring your service down to its knees, but probably won't end up costing you an arm and a leg. However, with (virtually) unlimited autoscaling, which is what serverless systems tend to provide out of the box, you may end up wishing that your system didn't scale quite so fast.
Amazon WAF (Web Application Firewall) lets you rate limit your CloudFront distributions and application load balancers, which means you can use this technique to protect Lambda functions deployed via Lambda@Edge. Unfortunately, there is no integration with API Gateway at the time of writing. It's possible to add a CloudFront distribution in front of API Gateway, but then you'd be paying for two CloudFront distributions as API Gateway already uses CloudFront internally.
AWS WAF is a pretty big topic in and of itself and would easily justify its own guide or online course. Fortunately, AWS provides some automated deployments, which means we can get a lot out of WAF without having to learn all the details of configuring it. Also, the source code and CloudFormation templates are shared in GitHub, which means you have a great starting point for your own customizations.
Setting up HTTP flooding protection
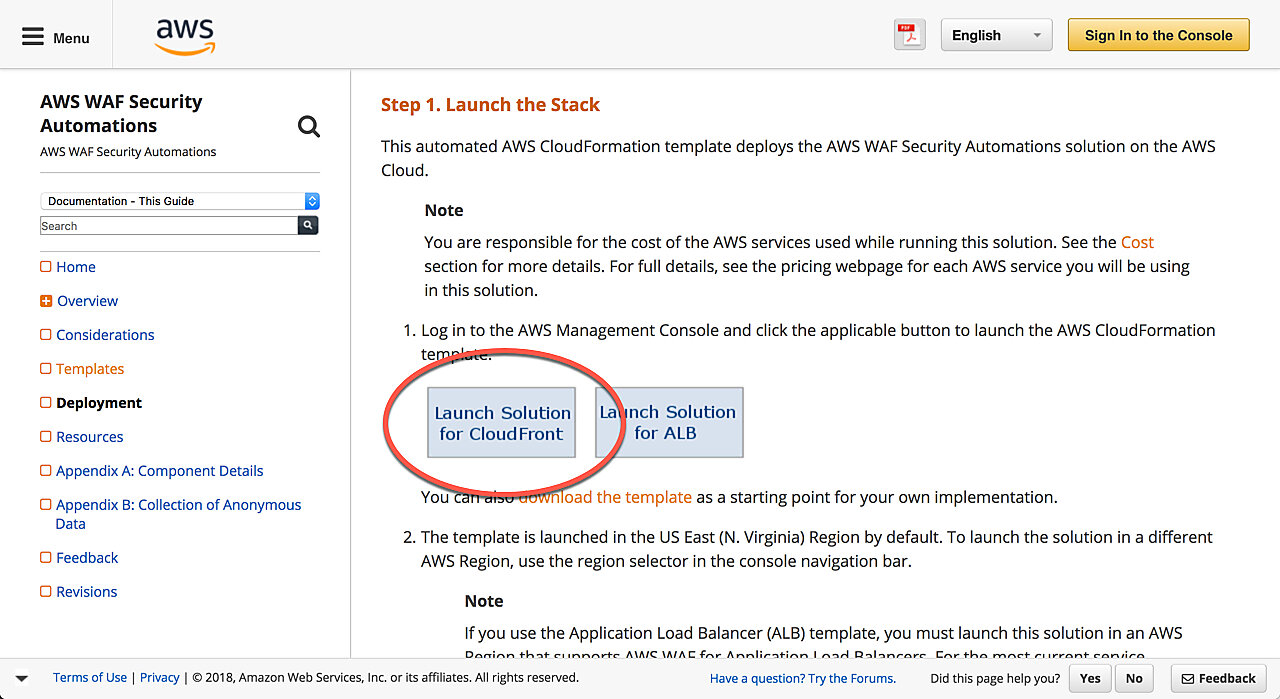
Step 1
Go to automated deployments and click the link that reads Launch Solutions for CloudFront
Step 2
On the Select Template page, you'll notice that the Choose Template field is prefilled for us with an S3 URL pointing to a template provided to us by AWS. Nothing to do here, click Next

Step 3
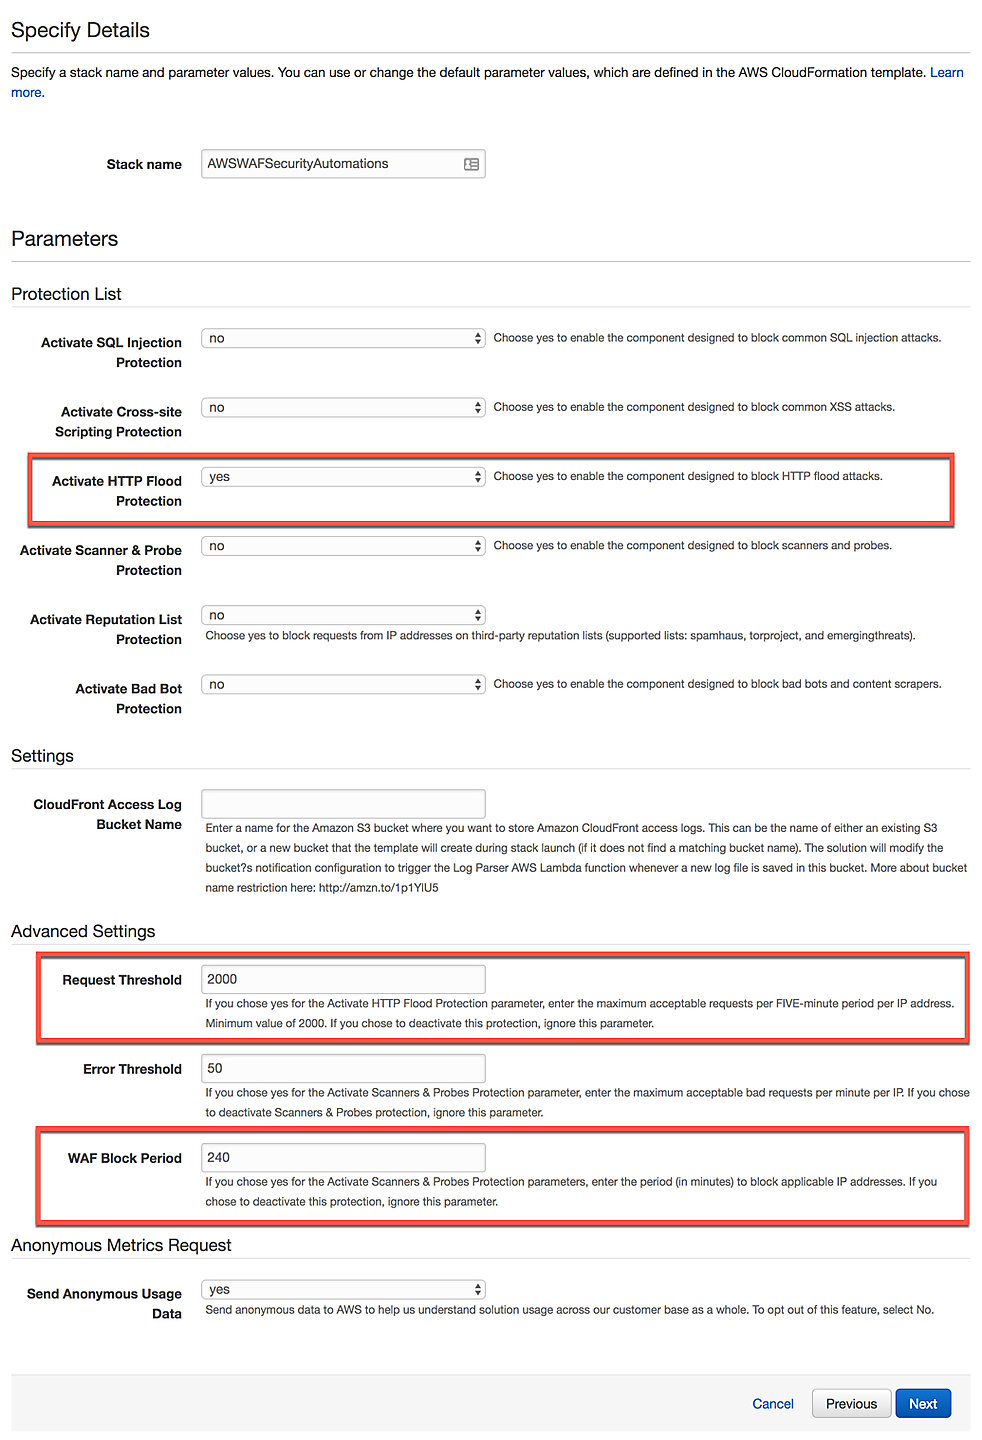
On the Specify Details page, we are asked to select which protections we'd like to have for our CloudFront resource. Note that each protection will cost you an extra $1 per month. The most relevant protection to this guide is the HTTP Flood Protection. Make sure to select yes on at least that one.
Still on the same page, pay attention to the field labeled Request Threshold. This is the maximum number of requests allowed from a single IP address per five-minute period. If the limit is exceeded the IP address will be blocked.
The next important option is just below, labeled WAF Block Period. This determines how many minutes an IP stays on the blacklist once it's been blocked.
Click Next twice, after which you should be on the Review page. The only mandatory thing here is to check the box labeled I acknowledge that AWS CloudFormation might create IAM resources. The CloudFormation template we've chosen will create new IAM resources, and AWS wants your acknowledgement before it can proceed. Finally, click Create.
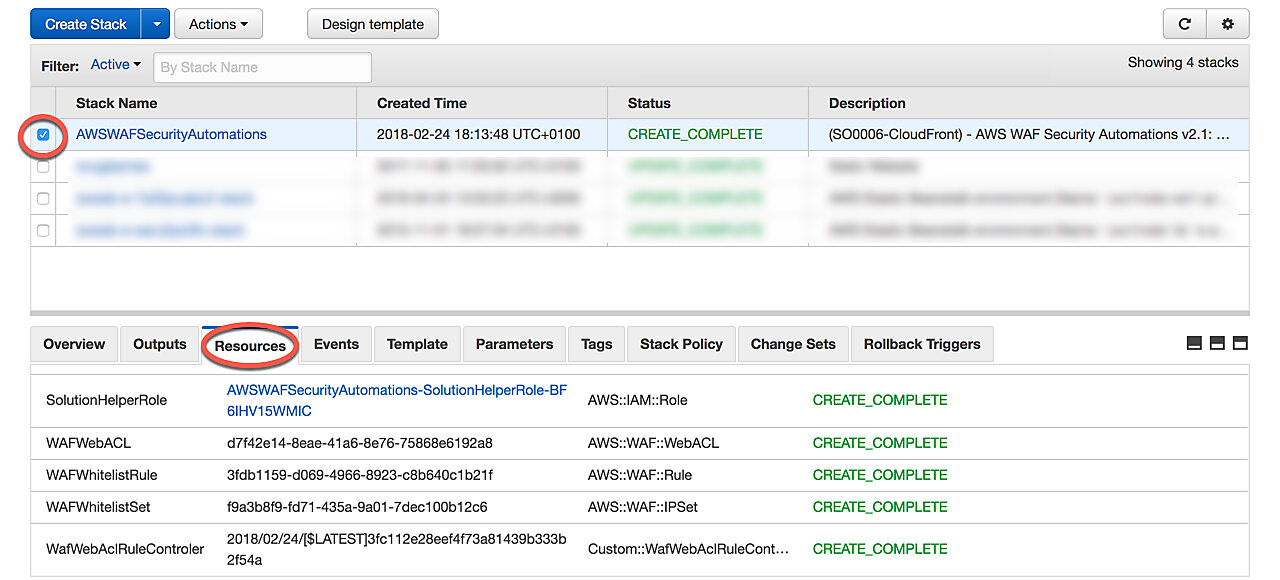
Step 4
You should now be taken to the main CloudFormation page that lists all your CloudFormation stacks. You may have to click the refresh button in the top-right corner to see the new stack. After a few minutes, the status of the stack should change to CREATE_COMPLETE. When you select the newly created stack from the list and open the Resources tab, you'll notice that AWS has created a new WAF WebACL, as well as several other resources such as Lambda functions.
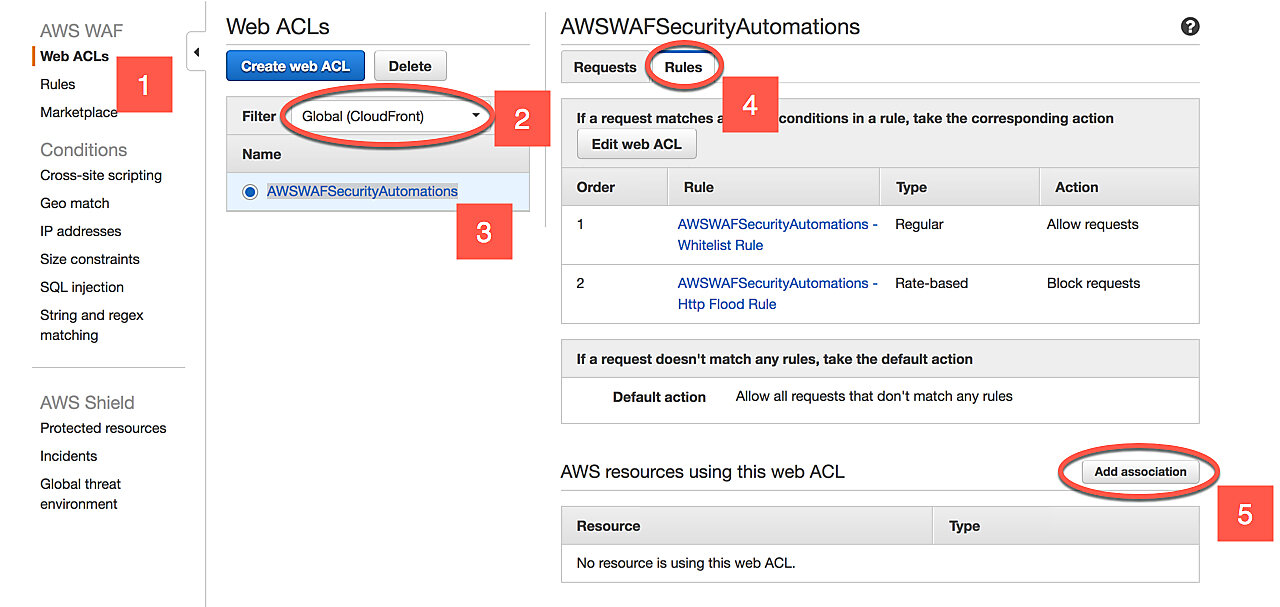
Step 5
Click the Services at the top of the screen and navigate to WAF & Shield. Once there, select Web ACLs in the left-hand sidebar and make sure the filter is Global (CloudFront). Click the name of the newly created WebACL (AWSWAFSecurityAutomations) and open the rules tab.
If you selected only the HTTP Flooding Protection when creating the stack, you should have two rules:
- AWSWAFSecurityAutomations - Whitelist Rule: This rule let's you keep a whitelist of IP addresses that can bypass all other rules. By default the list is empty, but you can manually add IPs to it.
- AWSWAFSecurityAutomations - Http Flood Rule: This rule protects us from HTTP flooding. When the rate of requests from a given IP exceeds the limit you set when creating the CloudFormation stack, that IP is added to a blacklist and cannot access your CloudFront resources.
Finally, click Add associations and select a CloudFront distribution you'd like to associate with this WebACL. You can add multiple associations without causing extra charges to your account.
That's it! You now have HTTP flooding protection on your CloudFront distribution.
Final Words
We covered quite a few techniques to both keep track of and limit the costs of your serverless application. I hope you learned at least one thing that you can apply to practice.
If you have any questions or comments about this guide, you can contact me via email or twitter, or leave a comment down below.