Having multi-factor authentication in the web UI is great but I do most of my AWS work via the CLI, so just blocking access to the GUI is not sufficient. In this tutorial, I explain how to apply multi-factor authentication also to your CLI/API users.
NOTE: This article assumes that you've already set up multi-factor authentication for your account. If you haven't but would like to, here's a video that explains how to do it. Once you have multi-factor authentication enabled for the web UI, you can read the rest of this article to learn how to use it for CLI as well.
Create an MFA-required Policy
First, create a multi-factor authentication policy following these steps:
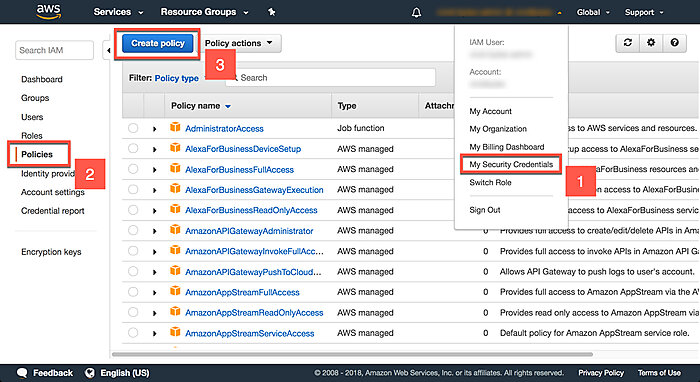
Navigate to My Security Credentials > Policies and click Create Policy
On the next page, open the JSON tab and copy the following policy into the textbox. This policy denies access to all resources unless the user has been authenticated using multi-factor authentication. Click Review Policy
1234567891011121314{"Version": "2012-10-17","Statement": {"Sid": "DenyAllWhenMFAIsNotPresent","Effect": "Deny","Action": "*","Resource": "*","Condition": {"BoolIfExists": {"aws:MultiFactorAuthPresent": false}}}}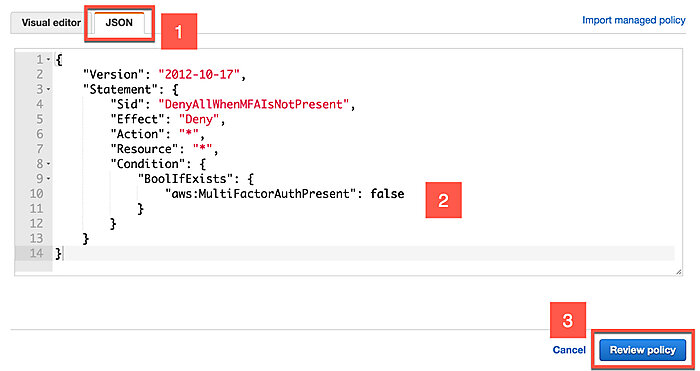
Give the policy a name, such as
mfa-required-policyand an optional description. Click Create Policy.
Understanding the MFA-required Policy
If you're not interested in knowing why the policy we just created works, and just want to start using it, skip the next two paragraphs.
Take a look at this helpful chart. What it tells you is that an explicit deny rule trumps all allow rules. In other words, it doesn't matter what other rules apply; unless the user is authenticated using multi-factor authentication, all their requests will be denied.
This means that it's easy to apply the requirement of multi-factor authentication to all resources, but if you want to be selective things can get a bit complicated. If you want to allow regular authentication by default and single out a few resources or actions for which you require multi-factor authentication, you can simply take the policy and replace the "*" in Action and Resource with whatever you want. However, the reverse is possible. You can't have multi-factor authentication by default and then declare a few resources for which you'd still like to use single-factor authentication. This article in the official documentation has some examples of different, more granular policies.
Attaching the MFA policy to Your User
Now, attach this new policy to a user. You have two options:
- Attach the policy directly to a user.
- Create a group for multi-factor authenticated users and add your user to that group.
Since we only have a single policy that we want to attach to users, I'm not convinced that creating a group adds a lot of value. Below, I'm going to show you how to do option number 1.
In the My Security Credentials view select the Users pane from the left-hand sidebar.
Select your user from the list by clicking their name and click the big blue button that reads Add Permissions.
On the Grant Permissions page, select Attach Policies Directly, look up the policy we just created from the list and tick the checkbox next to it. Then click Next: Review.
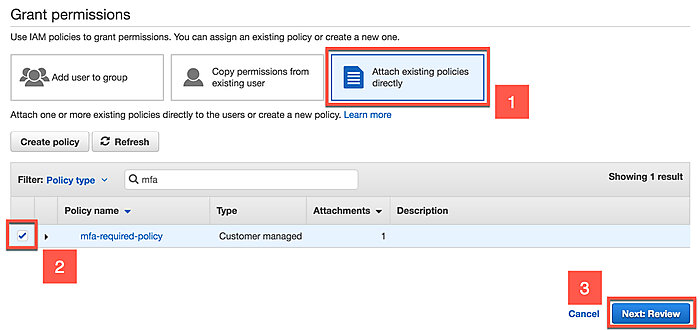
Click Add Permissions.
To test that the policy is working try using the CLI for anything your user
should normally have permissions to. You should get back an Access Denied
message. Below, I'm trying to list the s3 buckets on my account:
|
|
Great, so now I can't do anything! Let's learn how to use MFA-tokens to get around the policy we just installed.
Acquiring Session Credentials Using AWS CLI and MFA token.
AWS uses two types of credentials:
- long-term credentials The normal AWS_ACCESS_KEY_ID and AWS_SECRET_ACCESS_KEY
- short-term credentials Temporary credentials that are generated from your long-term credentials and, in this case, a multi-factor authentication token.
What AWS let's you do is use your MFA token to request short-term credentials. You can then use these short-term credentials to access anything the long-term credentials for that user would permit except with MFA restrictions removed.
Here's how to request short-term credentials using the CLI. The command you need
is aws sts get-session. It takes two parameters:
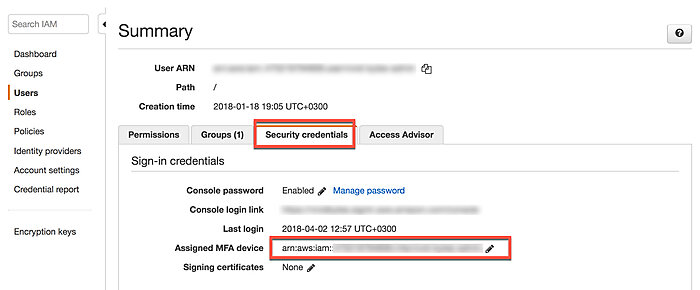
- serial-number:
Serial number is an identification code for your hardware or virtual ARN
device. If you've set up your user with a device, you can find the code in the
web console.
- token-code: This is the one-time code you get from your MFA device.
Once you have these two parameters, you can request short-term credentials like this:
|
|
If all goes well, you should get back something like the following:
|
|
By default, these credentials expire in 12 hours. You can change that by passing
in a --duration-seconds option to get-session-token command.
Using Short-Term Credentials
To actually use the short-term credentials, you have two options.
- Export them as environment variables123export AWS_ACCESS_KEY_ID=<Access-Key-as-in-Previous-Output>export AWS_SECRET_ACCESS_KEY=<Secret-Access-Key-as-in-Previous-Output>export AWS_SESSION_TOKEN=<Session-Token-as-in-Previous-Output>
Now, when you use the CLI it will default to those credentials. Try issuing a
command that your user has permissions to, such as the aws s3 ls I did earlier.
- Add them to your credentials file1234[profile-name]aws_access_key_id = <Access-key-as-in-returned-output>aws_secret_access_key = <Secret-access-key-as-in-returned-output>aws_session_token = <Session-Token-as-in-returned-output>
Now you can use these credentials by passing in the --profile option. For
example: aws --profile profile-name s3 ls.
Obviously, neither of these two methods is convenient if you use multi-factor authentication every day. That's why I wrote this simple program that allows me to quickly request MFA credentials and then start using them right away. Check it out and see if you like it.
There's also a project called broamski/aws-mfa, which gives you many more options. I haven't used it personally, but it looks like a reasonable solution for someone who finds my simple script too limiting.
As always, I hope this article was helpful. If you have questions or feedback, don't hesitate to leave a comment or shoot me an email.