In this tutorial, we'll build a real-time image optimizer using Lambda@Edge and CloudFront.
What is a real-time image optimizer?
A real-time image optimizer is a service that resizes the requested image according to specific query parameters. It then caches the image so that if the same image with the same parameters is requested again, it will be served from the cache.
For example, here's a link to an image that is resized to 320px in width: https://d1zabrrwa2dwma.cloudfront.net/20150817-IMG_6114.jpg?width=320. Here's a link to the same image with a width of 640px: https://d1zabrrwa2dwma.cloudfront.net/20150817-IMG_6114.jpg?width=640.
You can try replacing the width query parameter with different
values, and you'll notice that the server always returns an image with that
width. If you find a width that's never been requested before, it'll take a
couple of seconds to load as the resizing happens at request time. However, after
the first request, the image will be served from cache and will be lightning
fast.
There are commercial solutions, such as imgix, that follow this principle but do much more than just resizing. A stripped-down version of such a service is, however, almost trivial to build, and in this tutorial I'm going to show how.
What is Lambda@Edge?
Lambda@Edge is an extension of AWS Lambda. It lets you run Lambda functions in response to CloudFront events giving you the ability to modify static content that is served through CloudFront, such as images.
There are four possible events with which you can integrate Lambda.
- Viewer Request
- Viewer Response
- Origin Request
- Origin Response
The official documentation for Lambda@Edge has a neat diagram illustrating the differences between the events.
In this tutorial, we'll use the origin request event. This event is triggered after a cache miss, but before the origin request takes place, which gives us the ability to swap the origin resource to something else. In this case, we'll download the image from the origin server, resize it, and return the resized image, which will subsequently be cached by CloudFront.
Lambda@Edge has some limits. For example, the maximum response size is 1 MB, and the maximum timeout is 30 seconds (as opposed to 5 minutes for regular Lambda functions).
Why is this better than preprocessing images before uploading them to the server?
The main advantage of this solution is that you can slap it on any existing website without altering the code or the build process of that site. I find it particularly useful for static sites I host in S3.
Hosting the Images
Our starting point is a system where images are stored in S3 and served through CloudFront. I'm using S3 because it's easy, but it doesn't matter where the images are stored as long as you can retrieve them via HTTP.
First, I'll create a new S3 bucket called 'image-optimizer-demo' and upload a photo I took on my trip to the Lofoten Islands a couple of years ago. For the purposes of this tutorial, I make the image publicly accessible. It's also possible to keep access to S3 protected, but then you'll have to add extra privileges to the Lambda role.
The original image served directly from S3 is a whopping 2.5 MB in size and has a resolution of 2000 x 1221 pixels. We definitely want to do something about that.

Adding a CloudFront Distribution
Now that we have an image to optimize, we can get to the meat of this tutorial. The first step is to add a CloudFront distribution in front of the S3 bucket.
On the Create Distribution page pay attention to the following settings:
Origin Domain Name:
This is the domain where your images are hosted. In this case, I'll enter the url for the S3 bucket I created earlier (s3-eu-west-1.amazonaws.com). Update: if AWS gives you the option to select an S3 bucket from a dropdown, do not do that. Instead, write the domain name and path as instructed here. Selecting from the dropdown will later cause an error "The Lambda function associated with the CloudFront distribution is invalid or doesn't have the required permissions."Origin Path:
The path to the images. In this case, I'll insert the name of the bucket I just created. (/image-optimizer-demo)Query String Forwarding and Caching:
This is an important one. Given that we want to request images of different sizes using the query parameterswidthandheight, those parameters should be part of the cache key. In other words, two images with the same path, but different query parameters should be considered separate resources and cached independent of each other. Choose Forward All, cache based on all to get the correct behavior.Lambda Function Associations
This is where you can add a Lambda integration, but for now, let's leave this empty.
We can leave all other settings to their default values. Click Create Distribution to continue.
Now, a little bit of patience is required as the CloudFront distribution takes a few minutes to deploy. Once the distribution is deployed, we can verify that it's working by requesting the image through CloudFront by using the distribution domain name (d1zabrrwa2dwma.cloudfront.net in this case). The full path for the image I uploaded to S3 earlier is https://d1zabrrwa2dwma.cloudfront.net /20150820-IMG_6277.jpg. It's still the same image, but once requested it is cached at the nearest AWS edge location. This is already a significant improvement over the raw S3 data store.
Adding Lambda@Edge
Now that we have a working CloudFront distribution we can add the image optimizer Lambda. However, before we can create a new Lambda function, we need to create an IAM role that works with Lambda@Edge. At the time of writing, AWS doesn't provide a preset role for Lambda@Edge. Instead, we have to start with a regular Lambda role and add a trust relationship with Lambda@Edge. If you don't know what that means, don't worry. Here's a step by step walkthrough.
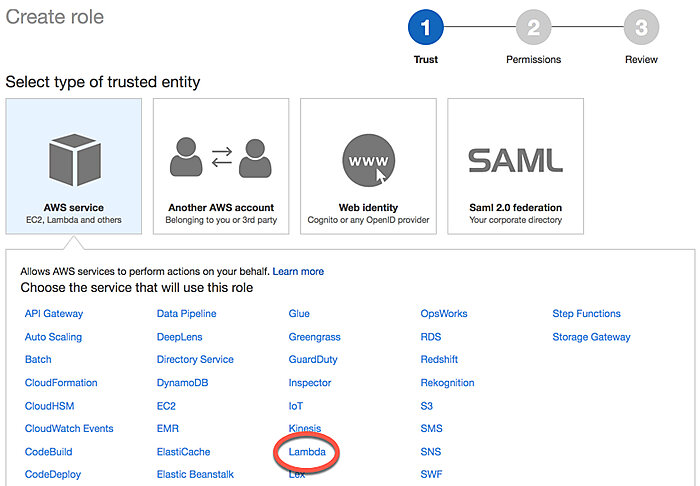
Navigate to IAM Roles in the AWS web console and click Create Role.
On the next page, where it says "Choose the service that will use this role," select Lambda and click Next: Permissions
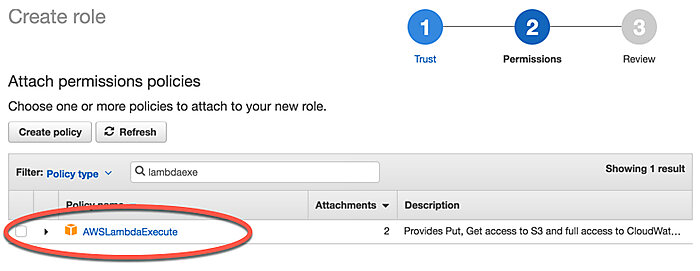
Select a policy called AWSLambdaExecute and click Next: Review.
Name your role image-optimizer-role and click Create Role.
On the IAM Roles page, you should see the new role listed. Click the name of the role to edit it.
Open the Trust relationships tab and click Edit trust relationship. Swap the existing Policy Document for the following and click Update Trust Policy.
123456789101112131415{"Version": "2012-10-17","Statement": [{"Effect": "Allow","Principal": {"Service": ["edgelambda.amazonaws.com","lambda.amazonaws.com"]},"Action": "sts:AssumeRole"}]}
Finally, we can create the Lambda function itself. Make sure you're in the us-east-1 (N. Virginia) region as all Lambda@Edge functions have to be created there. You can switch the region from the top-right drop-down menu in the AWS web console: select US East (N. Virginia).

To create a new function, navigate to Lambda functions in the web console and click Create function. On the next page, enter the following values into the form.
- Name: image-optimizer
- Runtime: Node.js 6.10
- Role: Choose an existing role
- Existing Role: image-optimizer-role (the role we created earlier)
On the next page, make sure to increase the Timeout to 15 seconds from the default 3 seconds. Large images can take a while to optimize. I also cranked up the memory allocation to 1536 MB.
Code
The commented source code used in this tutorial can be found on Github. It's about 100 lines of code and may look a bit intimidating at first sight, but it's not that bad. Most of the code is concerned with downloading the image from the origin server and handling various errors. Below, I'll do a breakdown of the most interesting parts:
Input
Let's first understand the input to this Lambda function. Finding documentation for AWS events can be infuriatingly difficult. I often find that the fastest way to understand the input is to log it on the first line of the Lambda function and then fetch the logs from CloudWatch. It's a bit ridiculous, but oh well... If you find proper documentation for these Lambda@Edge events, please let me know in the comments.
Anyway, by using the logging method, I managed to extract a sample input, which is enough for our purposes. Here it is:
|
|
The most interesting part for us is the origin object as well as the querystring and the uri. Using the origin and the uri, we can reconstruct the image url. We can then use the url to download the image to the Lambda instance and modify it.
|
|
Optimization
A rarely mentioned feature of AWS Lambda is that the Node.js Lambda environment comes with ImageMagick 6 preinstalled. We'll use that to resize the images.
To call external programs in node we can use the 'child_process' package.
|
|
We can then extract information about the desired width and height from the query string. I've decided, somewhat arbitrarily, to set the maximum width and height to 2000 px. Remember that the final response, including headers, must be below 1MB due to limits on Lambda@Edge.
|
|
Once we have the desired with and height, we can resize the image using
ImageMagick. The command for ImageMagick is convert, and the argument we use
is -resize. The \> symbols at the end of the new pixel size tell ImageMagick
not to touch the image if it's already smaller than the desired size. We'll also
set the jpg quality to 80 to keep the file size down.
|
|
ImageMagick is capable of much more than just resizing. You could, for example, crop, rotate, or colorize images. For this tutorial, however, we'll keep it simple.
Output
Fortunately, the output from Lambda@Edge has better documentation. To return an image from the Lambda we have to first read it to memory as base64.
|
|
Then we can return it in an http response by calling the succeed() method on the
context object, which is passed into the Lambda handler as the second
argument.
|
|
The originHeaders variable in the snippet above refers to the headers received
from the origin request (S3 in this case).
Adding a CloudFront Trigger
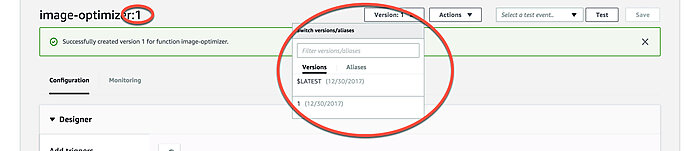
Before adding a trigger, you have to publish a new version of the Lambda. The reason for this, as far as I know, is that published versions are immutable and CloudFront will actually replicate the function to various edge locations. Every time you update the function, you have to update the trigger and wait for CloudFront to copy the new version to the edge locations. You can publish a new version in the web UI by clicking 'Actions > Publish' new version.

Once you've published a new version you should see the version number displayed in the function name. If not, you can select a version using the version drop-down selector.
Now let's add the CloudFront trigger. You can either go back to CloudFront and edit the distribution we just created or add the trigger right in the Lambda UI. I'm going to show how to do the latter.
In the Add triggers panel on the left, select CloudFront. You should see a CloudFront box appear on the right with text 'Configuration required'.
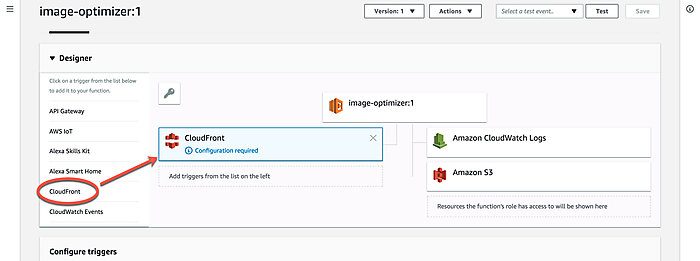
Scroll down to where it says Configure triggers. Select the following values:
- Distribution ID:
Id for the CloudFront distribution we created earlier. - Cache Behavior:
Earlier, we only created a default behavior, so just select that. If you server other resources besides images via the same distribution you should create a behavior just for jpg and png files and add the trigger to that instead, but that's beyond the scope of this tutorial. - CloudFront Event:
Select 'Origin Request'. - Enable trigger and replicate:
Check this box.
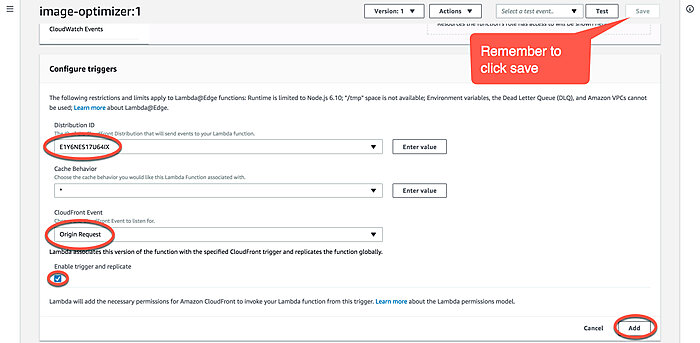
Click Add and, finally, remember to click Save in the top right-hand corner. Now, we just have to patiently wait for CloudFront to copy the Lambda to the edge locations and our real-time image optimizer is ready for use.

https://d1zabrrwa2dwma.cloudfront.net/20150820-IMG_6277.jpg?width=100
https://d1zabrrwa2dwma.cloudfront.net/20150820-IMG_6277.jpg?width=200
https://d1zabrrwa2dwma.cloudfront.net/20150820-IMG_6277.jpg?width=300Conclusion
I know this was a lot of steps and if you are a novice AWS user, it can be overwhelming. I still think it's quite amazing what you can do with just a few lines of code. Solutions like the one presented in this tutorial scale virtually infinitely and require little to no maintenance.
Hopefully, you can see that Lambda@Edge can be a really powerful tool. Image optimization is just one of the many use cases I can think of. Others could be, for example, A/B testing or Blacklisting IPs and other access control.
Unfortunately, in true AWS fashion, documentation is scarce and hard to come by. Let's hope that AWS improves their documentation in the future and that more tutorials pop up to make this technology more approachable.
I hope you've learned something. Please leave a comment if you have any questions or feedback.