I love static websites deployed on S3. They are maintenance free and dirt cheap to run. No databases to worry about and no need to sweat over deployments. The barrier to deploying a new website is virtually zero.
However, there is one small problem that's been bugging me for as long as I've deployed static S3-sites. While it's never been a deal-breaker, it has been an annoying little issue I've always wanted to fix, namely the fact that S3 uses the HTTP status code 302 instead of 301 in certain redirects.
More specifically, the problem is the following:
If you have a URL like mysite.com/posts/mypost, and you want to support the same URL but with a
trailing "/", mysite.com/posts/myposts/, you'll have to deploy your
page with the key of posts/myposts/index.html. Now S3 redirects
mysite.com/posts/mypost to mysite.com/posts/mypost/ using the wrong status
code.
Yes, it sounds ridiculous. Why is this even a problem? It's really just a question of HTTP semantics. 302 stands for 'Temporarily Moved' while 301 signifies a 'Permanently Moved' site. Returning 302 could lead search engines (Google) to treat these two pages as two different resources. What we want is to have the two URLs, the one with a trailing "/" as well as the one without it, to be treated as the same page.
With the introduction of Lambda@Edge, I finally have an adequate solution that I can easily apply to all my sites without having to change anything on S3.
What is Lambda@Edge?
I already wrote a blog post about Lambda@Edge and its application to image processing and I don't want to repeat everything here. In summary, Lambda@Edge is a way to intercept CloudFront requests at the edge location before or after they hit the origin server (S3 in this case). Go read the aforementioned blog post or the official documentation if you want to know more. You'll be able to follow through this article even if you skip both.
To make this work we'll intercept requests with status code 302 when they come back from S3 but before they get cached in CloudFront. Then we simply change the status code to 301.
Creating a CloudFront Distribution
I'm going to assume you've already enabled CloudFront to your site. If not, I've written another Lambda@Edge tutorial where I teach how to do that. Go on and create a CloudFront distribution based on those instructions and then come back to this article when you're done.
Creating the Lambda Function
Again, I've written about this subject before. There have been a few updates though, so I'll go over it again.
Navigate to the Lambda console and click Create function. On the next page, choose Author from scratch. In the form below, fill in the following values:
- Name:
Give the function a name that makes sense to you. I named mine s3-302-redirect. - Runtime:
Choose Node.js 8.10. It is important to select this specific version. The code in this tutorial won't run on older versions of node. - Role:
Select Create new role from template(s). Previously you'd have to go and create a custom IAM Role for Lambda@Edge functions. Recently though, AWS has added a template we can use for our function. - Role Name:
I named my role s3-302-redirect-role. You can, of course, name yours however you want. - Policy Template:
Choose Basic Edge Lambda permissions.
Code
The code for this function is extremely simple. Here's all the code we need:
|
|
You can just copy-paste this code into your function and you're golden. If you're interested in knowing why it works read the rest of this section.
First, we need to understand the input to the function as well as the expected
output format. The inputs can be found in AWS
docs. The
part we are interested in is the response object. Here's an example.
|
|
CloudFront expects a similarly formatted response object as output from the Lambda function. All we have to do then is check the status from the input. If it's 302 we change it to 301 and change the status description to 'Moved Permanently'.
Incidentally, since AWS released node 8.10 to Lambda, we can mark the Lambda handler async and just return the output, whether a promise or a normal value, instead of using a callback. We could also await inside the Lambda handler, but it's not necessary for this simple function.
Adding a CloudFront Trigger
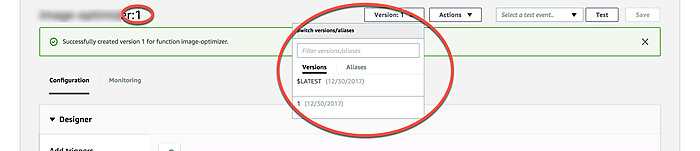
Before adding a trigger, you have to publish a new version of the Lambda. The reason for this, as far as I know, is that published versions are immutable and CloudFront will actually replicate the function to various edge locations. Every time you update the function you have to update the trigger and wait for CloudFront to copy the new version to the edge locations. You can publish a new version in the web UI by clicking Actions > Publish new version.

Once you've published a new version you should see the version number displayed in the function name. If not, you can select a version using the version drop-down selector.
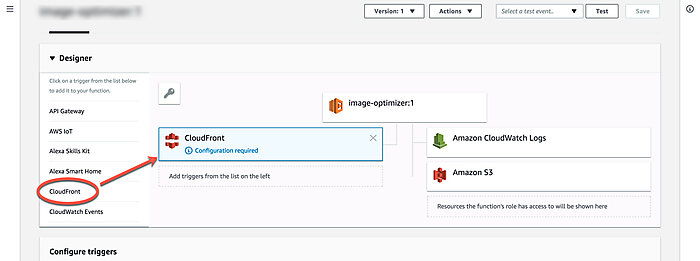
Now let's add the CloudFront trigger. You can either go back to CloudFront and edit your distribution or add the trigger right in the Lambda UI. I'm going to show how to do the latter.
In the Add triggers panel on the left, select CloudFront. You should see a CloudFront box appear on the right with text 'Configuration required'.
Scroll down to where it says Configure triggers. Select the following values:
- Distribution ID:
Select the CloudFront distribution ID you want to target. - Cache Behavior:
Select the behavior you want to target. You have to create a separate trigger for each behavior. - CloudFront event
Origin Response - Enable trigger and replicate
Check this box
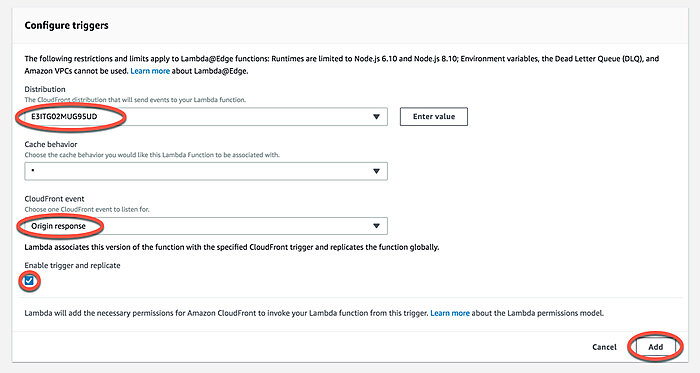
Click Add and, finally, remember to click Save in the top right-hand corner. Now, you'll just have to patiently wait for CloudFront to copy the Lambda to the edge locations. You may also want to invalidate your CloudFront cache to see the effect.
Conclusion
There you go, 302 redirects fixed. Call this a hack if you want, but it's a hack that works. So far, the main use case of Lambda@Edge for me has been adding features to static websites that I can't get from S3 and CloudFront alone. I'm not sure if that's what people in AWS had in mind when they released this feature. Somehow I feel like committing a small crime every time I use it, but oh well... it works.
Have you found other uses for Lambda@Edge? Let me know in the comments.